
Are you looking for commission software to automatically calculate commissions from Stripe sales data? Here is how you can do it using Sales Cookie‘s native connection to Stripe to:
- Automate your commission calculations
- Increase payment accuracy
- Eliminate the need to manually generate and distribute commission spreadsheets
- Provide a commission dashboard to each rep (with their own payouts, goals, etc.)
- Manage rates, bonuses, and quotas
- Legally protect your sales commissions
- Ensure compliance with accounting requirements (ASC 606)
Connecting To Stripe
This takes about 2 minutes. First, login to your Sales Cookie account, or sign up for a free trial. Next, go to Settings > Connections, and add a connection to Stripe.
Next, enter your Stripe API key. Your key will be double-encrypted (i.e. it will be encrypted inside an encrypted Microsoft Azure database!). Your key cannot be read back by anyone. It will be used to retrieve sales data from Stripe.

Importing Stripe Sales
Commission software solutions need a copy of sales data to calculate commissions. Go to Transactions > Add Transactions, and select Stripe as the data source.
Next, choose the type of records you want to import. You can import charges, invoices, or refunds. To import multiple record types, repeat the import operation multiple times.

Next, Sales cookie will retrieve sample data from Stripe, and ask you to map fields. For example, if you have a custom field called “Sales Rep” within your Stripe invoices, you’d map this field to the “Owner / Sold By” category. In the example below, we mapped the amount to the “Revenue” category.

Next, all your sales will be imported within Sales Cookie. Our commission software implements an hourly data sync. It incrementally retrieves new sales records from Stripe and automatically adds them to Sales Cookie.
Filtering Stripe Sales
You probably only want to pay commissions for eligible sales (ex: excluding cancelled invoices or failed charges). Go to Transactions > All Transactions, and build a filter to select eligible sales such as this:

Next, save your query and give it a name such as “Eligible Sales”:

Configuring a Plan
A plan is just a way to pay commission (ex: commission component). We configure plans for 99% of our customers. Sales Cookie has so many options so this saves you time. Also, many commission structures are quite complex and require careful configuration within our software. However, here is a simple walkthrough.
Let’s start by creating a new plan:

Go ahead and click Next > Next > Next to quickly create the commission plan:

Next, navigate to the Limits tab, and specify the filtering query you previously created:

Next, navigate to the Targets tab, and specify commissionable users. For example, this could be all users tagged as “Sales Executives”:

Next, navigate to the Incentives tab to add attainment levels and payouts. For example, this pays 5% of revenue with no attainment required:

That’s it – your plan is ready!
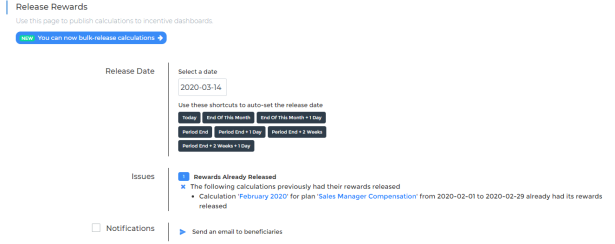
Calculating Commissions
We’re now ready to calculate commissions! You can set your calculations to run automatically, or you can submit calculations manually. Each calculation will process eligible sales within a chosen calculation period (ex: Q2). Each calculation will calculate commissions for all AEs in one shot. No need to generate spreadsheets manually, one at a time! Here are some sample calculations:

If you open these calculations, you can review all the deals credited to each rep and their payouts. You can also publish credits and payouts to rep dashboards:
Viewing Rep Dashboards
Sales Cookie eliminates manual generation / distribution of commission spreadsheets. Commission statements are available online to each rep for each pay period. For example, they will see something like this:

Or like this:

As well as their credited sales, payouts, etc.

For managers, additional views are also available:

Reviewing Commission Spend
We can also analyze our commission spend vs. revenue. For example like this:

Of course, you can build more sophisticated reports and dashboards:

Crediting The Correct Reps
Your Stripe data may not specify which rep should be credited with each sale. Here are different strategies you can use to solve this problem:
- For invoices, you could rely on Stripe’s custom properties – ex: set a custom property called “Sales Rep” on Stripe invoices as you create them
- For charges, your Stripe integration could set metadata fields – ex: set a metadata field called “Sales Rep” on Stripe charges
- You could decide to manually label each Stripe sale record within Sales Cookie by editing it and setting the owner
- Finally, you could use some dynamic crediting logic which we’ll configure for you – example:
- All sales within region “WA” should be credited to “John Doe”
- All sales for product “Soap Bar” should be credited to “Jane Doe”
- Otherwise, lookup a named account list to and credit reps by customer name
In Conclusion
